CheckAssets User Manual
Import your asset list onto your phone, check items off one by one with a scanner, see differences instantly, then export the results back. This manual follows the app's actual behavior, from uploading a worksheet through backup and restore.
What this app does
CheckAssets is an asset stocktaking tool for iPhone. The scenario: you already have your company's asset list in Excel, and you need to check every item one by one — is it actually there, and does it match what the list says?
The basic flow: upload the list → check items off one by one with a scanner (or manual entry) → see instantly what's found and what doesn't match → export the results back to Excel.
Built for fixed-asset stocktaking and property audits — the kind of work where you walk a list and check off items one at a time.
Requirements: iPhone, iOS 26.0 or later.
What to prepare before you start
2.1 Three Excel worksheets (.xlsx)
Before you start, it helps to prepare three Excel files. Only the "inventory detail sheet" is required — the personnel and location master files are optional, and you can always type a custodian or location by hand on the counting screen instead:
| Worksheet | Required? | Purpose | Required columns |
|---|---|---|---|
| Inventory detail sheet | Required | The list of assets to count this time | "Asset No." (the only required column; the case can be imported even if other columns are missing) |
| Personnel master file | Optional | Search and assign a "Custodian" | If imported, needs "Employee No." and "Name"; without it you can only type a custodian by hand while counting |
| Location master file | Optional | Search and assign a "Location" | If imported, needs "Location"; without it you can only type a location by hand while counting |
Important: the app maps data by the Excel column header names, not by column order — you can rearrange columns freely as long as the header text is correct. If you're not sure of the format, open "Upload Worksheet" and tap "Download Template" for three blank .xlsx templates with just the header row.
See Appendix A for the full column list. If the app detects non-standard or missing standard columns on upload, it shows a summary prompt before letting you into the counting screen; data in non-standard columns is still preserved and included on export, it's just not shown on the counting screen.
2.2 A scanner (optional — manual entry also works)
The app supports Bluetooth or wired HID scanners (the kind the system recognizes as a "keyboard"). Once paired/connected, whenever the app detects an external keyboard device, the input field at the bottom of the screen stays ready to receive scans automatically; without a scanner connected, the keyboard won't pop up automatically — tap the field first, then type the asset number.
Creating a case (uploading a worksheet)
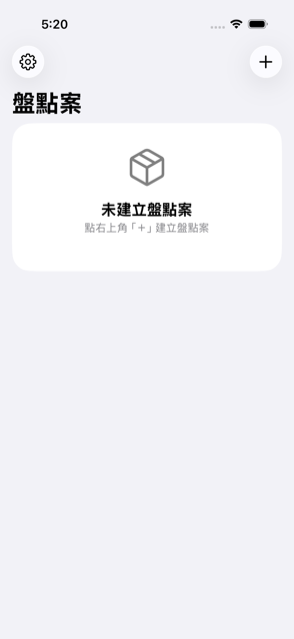
Home screen "Cases" list
With the "+" button at top right (shown before any case has been created)
- Open the app, and on the home screen (titled "Cases") tap the + icon at top right to open "Upload Worksheet."
-
In the "Worksheets (.xlsx)" section, tap each of the three rows (inventory detail sheet / personnel master file / location master file) in turn to pick the matching Excel file; each row is labeled "Required" or "Optional" (only the detail sheet is required). A selected row shows a checkmark and the filename, and its button changes from "Select" to "Replace."
💡
Not sure about the column format? Tap "Download Template" below this section first, for three blank .xlsx templates with only the header row — fill in your data to match, then upload.
💡Just want to try it out? This screen also has a "Load Sample Data" button, so you can walk through the whole flow with built-in sample data instead of a real worksheet. Sample cases aren't included in automatic backups and aren't meant for real work. If you've already selected files, tapping this button will warn "You already have inventory data imported — cannot load sample data" — clear your selected files first to switch to sample data.
-
Choose Initial Count or Recount for the "Count Stage":
Initial Count Recount (full) Available statuses 5: Match / Scrapped / Transferred / Other / Missing 11 (also Taken out / Idle / Under repair / Off-site / On loan / Overseas) Scanning an asset number not on the worksheet Only shows "not found," cannot add Can "Add as surplus" Overdue on-loan tracking Not recorded or shown Recorded and shown Summary items on the Results page Only Initial-Count-applicable items All items shown ⚠️This choice cannot be changed after the case is created — double-check it before continuing.
- Enter this case's number in the "Case No." field. Leave it blank and the app will use the "Case No." column from the detail sheet automatically. (With sample data, a sample case number is filled in for you — feel free to edit it.)
- Once everything looks right, tap Create Case at the bottom. The app first shows a confirmation: "This case will be recorded as an Initial Count (or Recount) and cannot be changed after creation. Create it?" Tap Confirm to finish and jump straight into the counting screen. If the imported worksheet's columns differ from the standard format, an "Import complete (column differences)" dialog explains the differences first — tap "Continue" to proceed to counting.
Counting (scanning and checking off)
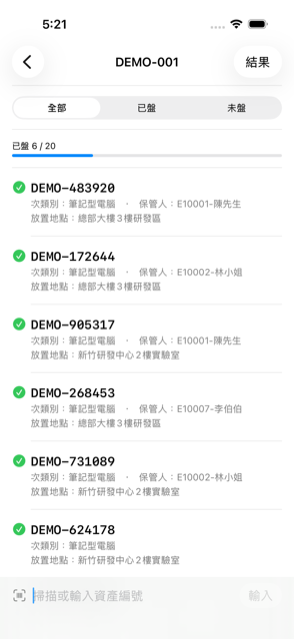
Main counting screen
Filter tabs · progress bar · scan input row at the bottom
Once inside a case, the screen has three parts, top to bottom:
4.1 Filter tabs
At the very top are three tabs — "All / Counted / Not Counted." Switching tabs filters the list below to matching assets, and the progress text and calculation above change to match (for example, "Counted" shows the counted total and whether there are currently any differences).
4.2 Scan / manual entry
At the very bottom is the scan input row, with a scan icon and an input field (placeholder "Scan or enter asset no."):
- With a scanner: aim at the barcode on the asset — the scan result is submitted and matched automatically, no extra tap needed.
- Manual entry: tap the field to bring up the keyboard, type the asset number, then tap "Enter" or the keyboard's return key.
After submitting, one of these happens:
- Matching asset found: a success haptic plays, and that item is marked "Counted." If Quick Count in Settings is off (the default), the app jumps automatically to the asset detail screen; if Quick Count is on, it stays on the list so you can scan the next item right away (the existing status and tag status are left unchanged, only the scan status is set to counted) — you can still tap the item to open the detail screen and adjust it manually.
-
No matching asset: a warning haptic plays and an "Asset Not Found" dialog appears, reading "No asset number 'XXX' in the worksheet":
- During a Recount: an extra "Add as surplus" button appears — tapping it adds the item to the list, marks it counted, and categorizes it as "surplus" (present on-site but not on the original worksheet).
- During an Initial Count: there's no add option, only "OK" to dismiss the dialog (surplus isn't tracked during an Initial Count).
Whatever you type in the input field also live-filters the current tab's list (matching against the asset number, plus any columns enabled under "Column Display" in Settings). If filtering finds nothing, the screen shows "A matching asset exists but is hidden by the current filter — enable the column in Settings," meaning the data exists but that column isn't set to show/match.
4.3 Asset list
Each row shows: the asset number, a checkmark for counted/not-counted, an orange badge for surplus or any non-"Match" status, a blue badge for a tag needing reprint, the subcategory and custodian (if present), and the location (if present). Tap any row to jump straight into that asset's detail screen.
Asset detail screen
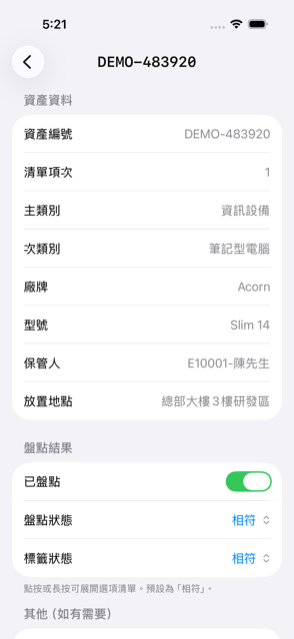
Asset detail screen
Tapping any item in the list, or scanning a matching asset with Quick Count off, opens this screen; the asset number is shown in the title bar.
5.1 Count result
- Counted: a toggle to mark or unmark this item as counted; turning it off clears the counted timestamp.
- Status: tap or long-press to choose from a menu (11 options during a Recount, 5 during an Initial Count — see Chapter 10), defaulting to "Match"; shown in orange when it's anything else.
- Tag status: tap or long-press to choose "Match" or "Needs reprint," defaulting to "Match."
5.2 Asset data
Shows the worksheet columns for this asset (which columns appear is controlled by Settings → Appearance → Column Display, see Chapter 8). The asset number always appears fixed at the top; empty-valued columns are hidden.
5.3 Other fields (when applicable)
- Overdue on loan (Recount only): choose blank / Yes / No.
- Custodian adjustment: tap to open a half-sheet panel, search the personnel master file by employee number or name and pick one directly; you can also type a value not in the master file under "Custom entry." If already adjusted, a "Clear adjustment" button appears to undo it. Picking from the master file writes the value as "Employee No.-Name."
- Location adjustment: works the same way, searching the location master file instead.
- Notes: a free-text field, supports multiple lines.
All of the fields above are saved instantly on any change — there's no "Save" button, and nothing is lost even if you close the app and come back, so you can count in multiple sessions.
Reviewing results
Tap Results at the top right of the counting screen to open the "Results" screen.
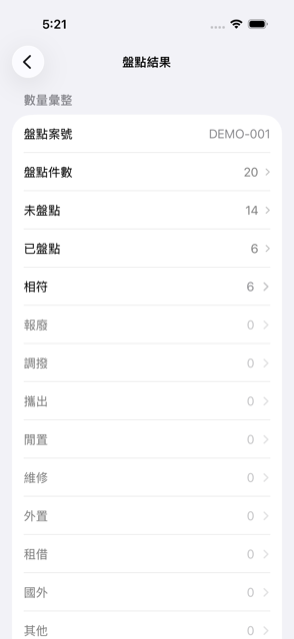
Results screen
6.1 Summary
A list of overall numbers, including:
- Case No.
- Total / Not Counted / Counted item counts — tapping any of these three rows jumps back to the counting screen on the matching filter tab
- A count for each status relevant to the current count stage (Match, Scrapped, Transferred, …)
- Surplus (Recount only): items found on-site but not on the original worksheet
- Tag match / Tag needs reprint counts
- Custodian adjustments / Location adjustments counts, with a short "before → after" summary
- Overdue on loan (Recount only)
Every row except "Case No." can be tapped when its count is greater than 0, jumping to an asset list filtered to just that item — handy for quickly reviewing one category. Rows with a count of 0 are shown but not tappable.
6.2 Difference comparison
Shows the total number of assets that "don't match what the worksheet expected." Tap in to see the full difference list — each asset lists its reason(s), which can be more than one, for example:
- Surplus
- Status: Scrapped (or any other non-Match status)
- Tag status: Needs reprint
- Custodian adjustment: XXX
- Location adjustment: XXX
- Overdue on loan
Not-yet-counted worksheet items aren't included in the difference comparison — they only show up in the summary's "Not Counted" count.
6.3 Exporting (Excel)
- Export full list: everything in this case.
- Export differences list: only the items with differences.
Tapping either export button generates an .xlsx file and opens iOS's share sheet — you can "Save to Files" on your phone or a cloud drive, or share it directly via AirDrop, Messages, Mail, and so on.
See Appendix B for the filename convention and column layout.
Case list (app home screen)
The app's home screen (titled "Cases") lists every case you've ever created, sorted by last-updated time, each showing:
- Case number (unnamed cases show "(Untitled)")
- A "New" badge (means this case just arrived via Handoff and hasn't been opened yet — disappears the first time you open it)
- A "Sample" badge (for cases created from sample data)
- A count-stage badge (Initial Count / Recount)
- Completion status ("Done" or "In Progress"), a "Counted X / Y" figure, and a progress bar
- Last-updated time
Tap any case to jump straight into it and continue counting.
7.1 Deleting a case
Swipe the case left and tap the red "Delete" button — a confirmation dialog shows the counted total and warns "cannot be undone once deleted":
- If the case has a local snapshot, an extra "Delete and clear snapshot" option removes the snapshot too
- "Delete case only" removes just the case, keeping the local snapshot
7.2 Handoff (passing a case to someone else)
Swipe a case left and you'll see a blue "Handoff" button (not available for sample cases). This packages the entire case — including everything counted so far — into a single file you can send via AirDrop, Messages, Mail, and so on to another device running this app, to continue counting there.
The first time you use Handoff, a risk warning appears first: "The handoff file contains employee IDs, purchase costs, and other data, and will leave the app's protection once shared. Please confirm the recipient." Tap "Continue" to generate the file and open the share sheet; this warning won't repeat on later handoffs.
For the recipient to import a handoff file, see Chapter 8, "Import Case"; alternatively, opening a .checkassetscase file directly from the Files app, Mail, or an AirDrop prompt opens the app and completes the import automatically — no need to go through Settings first. Importing a handoff file always creates a brand-new case, never overwriting anything already on the recipient's device.
7.3 Top toolbar
- Gear icon, top left: opens Settings
- +, top right: creates a new case (opens Upload Worksheet)
Settings overview
Open "Settings" from the gear icon at the top left of the home screen.
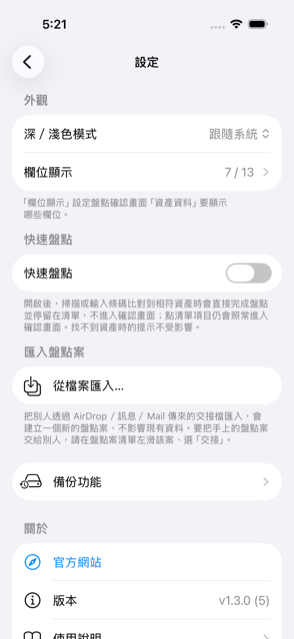
Settings screen
8.1 Appearance
- Light/dark mode: System / Light / Dark.
-
Column Display: chooses which worksheet columns appear in the "Asset Data" section of the confirmation screen, and also sets the matching range for the counting screen's live filter. The sub-page has three quick presets — Minimal / Standard / Full — at the top, plus individual toggles below for fine-tuning (flipping any one toggle switches the preset to "Custom"):
Preset Included columns Minimal Row No., Asset No., Category, Custodian, Location Standard (default) Row No., Asset No., Category, Subcategory, Brand, Model, Custodian, Location Full All 14 columns "Asset No." is always shown and isn't listed as a toggle; empty-valued columns don't show even when enabled.
8.2 Quick Count
When on, scanning or entering a code that matches an asset marks it counted and stays on the list immediately, without jumping to the confirmation screen (the "not found" prompt is unaffected); tapping a list item still opens the confirmation screen as usual for manual adjustments. Useful when you want to sweep through quickly on-site and adjust details later.
8.3 Import Case
Tap "Import from Files…" and choose a handoff file (.checkassetscase) someone sent you via AirDrop/Messages/Mail — this creates a new case without touching existing data, landing you back on the case list rather than jumping straight in.
To hand your own case to someone else, go to the case list, swipe the case left, and choose "Handoff" (see §7.2).
8.4 Backup
Opens a sub-page — see Chapter 9 for details.
8.5 About
- Version: the currently installed app version
- User Guide: the app's built-in six-step quick guide
- Third-Party Components: lists the open-source package this app uses (ZIPFoundation) and its license
- Privacy Policy: the condensed in-app version, covering where data is stored, optional backups, third-party components and tracking, deleting your data, data you actively share, and contact info; see the full version on the site's Privacy Policy page
Backup & restore
Under "Settings → Backup" there are three independent backup paths that never merge with each other.
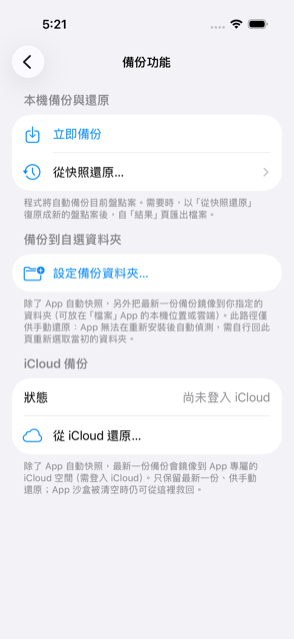
Backup screen
9.1 Local backup & restore (automatic)
The app automatically snapshots the case you're currently counting (worksheet data plus your progress) whenever you switch to the background or return to the home screen, storing it inside the app. This runs in the background without interrupting anything, and doesn't need to be triggered manually. Sample cases are never snapshotted.
You can also back up manually: tap "Backup Now" — success shows "Backup complete"; if there's no active case, or it's a sample case, you'll see "Sample cases aren't backed up," which isn't treated as a failure.
To restore: tap "Restore from Snapshot…" to see every local snapshot (case number, counted X/Y, saved time) and tap one to restore it. Restoring always creates a new case — it never overwrites your current data. This screen also lets you swipe-delete snapshots one at a time, or use "Clear All Snapshots" to wipe them in bulk; if any "orphan snapshots" appear (old snapshots with no matching case, usually left behind after deleting a case or restoring multiple times), you can clear those in one go too.
Limitation: local snapshots live only in the app's own storage, so they're lost if the whole app is removed and reinstalled. If you need to survive that scenario, set up "Backup to a Custom Folder" below, or enable "iCloud Backup."
If the local database was ever rebuilt automatically after corruption and your case list came up empty, the app proactively offers a "Restore from Snapshot" prompt on launch as long as a local or iCloud snapshot still exists (checking local first, then iCloud) — you don't need to go find Settings yourself.
9.2 Backup to a custom folder
Beyond the local snapshot, you can designate an additional folder (on your phone or in the cloud); the app automatically mirrors the latest snapshot there each time.
The first time you set this up, a risk warning appears: "This backup includes employee IDs, purchase costs, and other data. If the folder you choose syncs to iCloud Drive or another cloud service, that content will be synced to the cloud and visible in the Files app. Please choose carefully." Tap "Continue" to open the folder picker.
This path can only be restored manually: tap "Restore from Custom Folder…" and pick one — this also always creates a new case. Reinstalling the app does not remember your previously chosen folder — you'll need to select it again from this screen. You can also "Choose a Different Folder" or "Turn Off Folder Backup" at any time.
The first time you create a real (non-sample) case without a custom folder set up yet, the app proactively asks once, "Set up a backup folder?" — choose "Go to Settings" to jump there, or "Not Now"; it won't ask again after that.
9.3 iCloud backup
Independent from the other two paths and never merged with them: each time a local snapshot completes, the latest one is also mirrored automatically to an app-specific iCloud container (accessible only to this app — it won't show up in the Files app's iCloud Drive, and only the latest snapshot is kept, with no history).
- Signed in to iCloud: status shows "Signed in to iCloud" — tap "Restore from iCloud…" to pick one, again always creating a new case.
- Not signed in: status shows "Not signed in to iCloud," and "Restore from iCloud…" is grayed out until you sign in to iCloud in the iPhone's system Settings.
This path can also only be restored manually, for rescuing your data if the whole app is removed and reinstalled, or local data is cleared.
9.4 Files app exchange folder
Using the built-in Files app, or Finder over a cable, you can access this app's "Exchange" folder to manually move non-sensitive files in and out — for example, a worksheet waiting to be imported, or an already-exported report.
This folder is not a backup location: no backup or snapshot data is ever stored here, and it's removed along with the app on uninstall — don't use it for long-term storage.
9.5 If the database won't open
If you reopen the app and see a "Database couldn't be opened" screen, the system tried to rebuild the database but didn't succeed. Reopen the app, then go to "Settings → Backup → Restore from Snapshot" and pick your most recent case snapshot to keep working.
Status reference table
"Status" defaults to "Match"; the remaining options differ by count stage (Initial Count / Recount) — apply your organization's own asset-management rules when deciding what each status means for a given item:
| Status | Initial Count | Recount |
|---|---|---|
| Match | ✓ | ✓ |
| Scrapped | ✓ | ✓ |
| Transferred | ✓ | ✓ |
| Other | ✓ | ✓ |
| Missing | ✓ | ✓ |
| Taken out | — | ✓ |
| Idle | — | ✓ |
| Under repair | — | ✓ |
| Off-site | — | ✓ |
| On loan | — | ✓ |
| Overseas | — | ✓ |
"Tag status" doesn't vary by stage — just "Match" or "Needs reprint," defaulting to "Match."
FAQ & notes
Q.The scanner isn't responding — what's wrong?
First confirm the scanner is properly connected (Bluetooth or wired). The app only keeps the input field ready for scanning automatically when it detects an external keyboard device (the scanner); if none is connected, tap the input field at the bottom of the screen first before scanning or typing.
Q.I scanned an asset number that isn't on the worksheet at all — what happens?
During a Recount, you can choose "Add as surplus" to add the item to the list. During an Initial Count, adding isn't supported — you'll just see "not found."
Q.I accidentally deleted a case — can I get it back?
A deleted case cannot be restored directly. If it had a local snapshot (and you chose "Delete case only" rather than "Delete and clear snapshot"), go to "Settings → Backup → Restore from Snapshot" to recover most of the data. If the snapshot was also cleared, it cannot be recovered.
Q.Is data in a handoff file or custom-folder backup safe?
Both handoff files and custom-folder backups contain fields like employee IDs and purchase costs. Once that content leaves your phone — shared out, or a folder synced to the cloud — it's no longer protected by the app. Double-check the recipient before sharing a handoff file, and check whether your chosen folder syncs somewhere outside your organization's control before setting up folder backup. iCloud backup is different: it mirrors only to an app-specific private space under your own iCloud account, never shows up in the Files app or to other apps, and the developer cannot access it either.
Q.I picked the wrong Initial Count / Recount option when creating a case — now what?
This choice can't be changed after a case is created — you'd need to delete it and start over. Check the table in Chapter 3, step 3 carefully before tapping "Create Case."
Appendix A: Worksheet column reference
Inventory detail sheet (columns 1–14 are customizable; 15–20 are result columns)
| Excel header | Shown on screen as | Notes |
|---|---|---|
| 項次 | Row No. | |
| 盤點案編號 | Case No. | Used automatically if the Case No. field is left blank |
| 資產編號 | Asset No. | The only required column, always shown |
| 主類別 | Category | |
| 次類別 | Subcategory | |
| 廠牌 | Brand | |
| 型號 | Model | |
| 部門 | Department | |
| 採購成本 | Purchase Cost | Sensitive data — take care when it flows into a backup or handoff file |
| 保管人 | Custodian | |
| 資產歸屬 | Asset Ownership | |
| 應用情境 | Use Case | |
| 財物分類 | Property Classification | |
| 放置地點 | Location | |
| 盤點狀態 | (result column 15) | Existing values are carried over on a Recount upload |
| 標籤狀態 | (result column 16) | Same as above |
| 外置租借逾期 | (result column 17, Recount only) | Same as above |
| 備註 | (result column 18) | Same as above |
| 保管人調整 | (result column 19) | Same as above |
| 放置地點調整 | (result column 20) | Same as above |
Personnel master file
Required columns: Employee No. and Name. Picking an entry writes the value as "Employee No.-Name"; if "Department" is filled in, it appears as a subtitle in the custodian picker's search results.
Location master file
Required column: Location.
Appendix B: Export file format
Exported filenames follow this pattern:
<Case No.>_<Full List or Differences List>_<export time yyyyMMdd_HHmm>.xlsx
For example, case A-113 exported as a full list on 2026-09-10 at 14:30 would be named A-113_Full List_20260910_1430.xlsx (the list-type segment is written in Traditional Chinese in the actual filename, matching the app's UI language).
- Recount export: always starts with the standard 20 columns (in the order shown in Appendix A); any non-standard columns from the worksheet are appended after, keeping the output layout stable.
- Initial Count export: follows the uploaded worksheet's original column order, and omits the "Overdue on Loan" column.
- Not-yet-counted worksheet rows keep their "Status" and "Tag Status" columns blank — they're never written as "Match" by default, nor treated as "Missing."
- The differences list only includes assets flagged as different under §6.2.